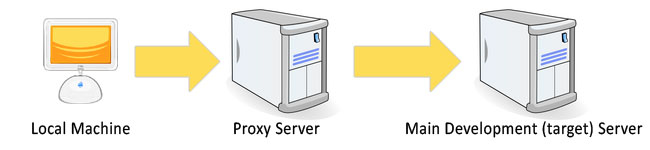
Remote Editing in Zend Studio for Eclipse has to be one of the biggest reasons why I use it in my current job. I work from home and our team’s development environment is securely setup on a Linux server with a firewall open only to specific IP addresses. This is a no biggie if my IP address never changes or if I work only in one place. Unfortunately, that’s not the case for my DSL setup – I get a different IP address everyday. And since I can’t bug the server admin every time I need to have my IP address added to the firewall, I connect through our proxy server first and then connect to the main development server. The setup’s kinda like this:
The problem now is Zend Studio doesn’t seem to support this kind of setup. At least, that’s what I concluded after so many hours of googling. Then I found this super awesome article. We can use Putty! Or just plain ol’ Terminal on a Mac (Linux should be the same I think).
Tools needed
Of course you need Zend Studio for Eclipse. You just need Putty if you’re on Windows. You’ll just need the already available/installed Terminal on a Mac (it’s in Applications > Utilities).
Proxy setup
Open up Putty/Terminal. Enter this into the console:
ssh -D 8080 username@proxydomain.com
The “8080” should be an unused port on your machine. In most cases, port 8080 is fine. The “username” should be the user name you need to login to the proxy server (ie proxydomain.com). You should be prompted with the password after entering this command. This will create a tunnel on the port 8080 where all HTTP traffic will go through the proxy server. That is, if an application uses the port 8080 as a proxy. This won’t have any effect on your current applications (i.e. browsers) unless you modify your settings to use this proxy. Please note that you’ll have to keep the terminal window open so your proxy session won’t be destroyed. There are probably other ways to make it work without the window left open but I’m content with this.
Modifying Zend Studio settings
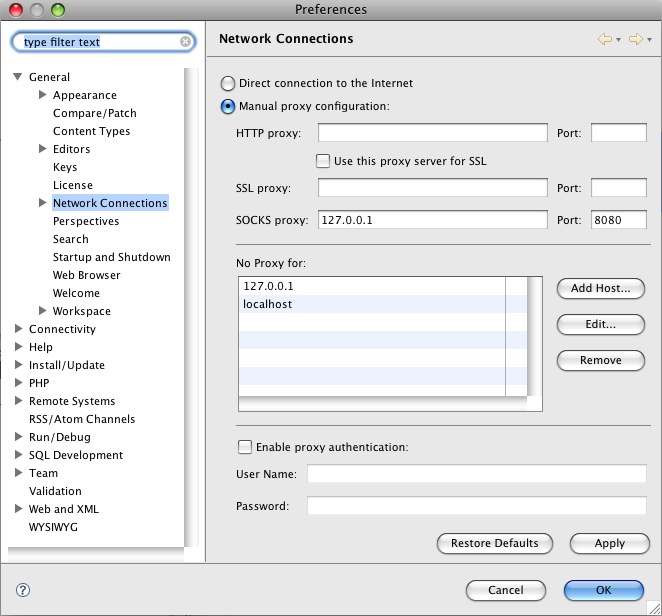
Since we now have a proxy available, we need to instruct Zend Studio to use it.
- Open Zend Studio.
- Go to Preferences (located under the Application menu on Mac and under Window on Windows)
- Navigate to General > Network Connections
- Set the proxy setting to Manual proxy configuration. And enter 127.0.0.1 in the SOCKS proxy field and 8080 on the Port field beside that.
Your setup should look something like this:
Save the settings and you should be ready to open up a connection to the target server (in this case, the main development server). Create a remote connection to your target server like you normally would. I couldn’t discuss that here but this might help.