Update Jan 13, 2012: It looks like setting a custom image service is no longer available on Twitter for iPhone. Tweetbot allows it though. This article still works for Tweetbot. For the rest of this article, please treat the text “Twitter for iPhone” as any app that supports custom image services (e.g. Tweetbot).
We’ve just recently deployed a custom endpoint to allow Twitter for iPhone users to post their pics through PicLyf.
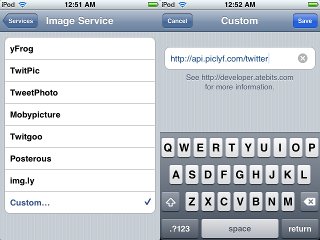
When you attach an image to a tweet, Twitter for iPhone will upload that image to the image service of your choice. It allows you to choose from various
image services (e.g. yFrog, Twitpic, TweetPhoto) or a custom image service. In our (PicLyf) case, it was custom. We made a custom endpoint:
http://api.piclyf.com/twitter. Using this url as the custom image service, attached images will be uploaded to the user’s PicLyf account.
Implementation
This functionality works through the use of OAuth Echo. From Twitter:
OAuth Echo is a means to securely delegate OAuth authorization with a third party while interacting with an API. Within the Twitter ecosystem, we use OAuth Echo as a means to allow your application to use services such as Twitpic and yfrog.
You may want to read about OAuth Echo first. Basically, Twitter for iPhone sends you the image along with the OAuth credentials of the user who wants to upload the image. Note that the OAuth credentials also includes the app’s consumer key. What you’ll have to do is use these credentials and verify them with the Twitter API. If the verification succeeds, you will receive the user’s Twitter information. You may then save the image in your server and link it with the user’s Twitter account. Lastly, you will have to return the correct response to Twitter for iPhone specifying the url where the image can be viewed:
<mediaurl>http://foo.com/bar/pic-url.html</mediaurl>
Sample code in PHP
Here is a sample class which encapsulates the OAuth Echo process:
class TwitterOAuthEcho
{
  public $verificationUrl = 'https://api.twitter.com/1/account/verify_credentials.json';
  public $userAgent = __CLASS__;

  public $verificationCredentials;

  /**
    *
    * @var int
    */
  public $resultHttpCode;
  /**
    *
    * @var array
    */
  public $resultHttpInfo;
  public $responseText;

  /**
    * Save the OAuth credentials sent by the Consumer (e.g. Twitter for iPhone, Twitterrific)
    */
  public function setCredentialsFromRequestHeaders()
  {
    $this->verificationCredentials = isset($_SERVER['HTTP_X_VERIFY_CREDENTIALS_AUTHORIZATION'])
      ? $_SERVER['HTTP_X_VERIFY_CREDENTIALS_AUTHORIZATION'] : '';
  }

  /**
    * Verify the given OAuth credentials with Twitter
    * @return boolean
    */
  public function verify()
  {
    $curl = curl_init($this->verificationUrl);
    curl_setopt($curl, CURLOPT_USERAGENT, $this->userAgent);
    curl_setopt($curl, CURLOPT_HEADER, false);
    curl_setopt($curl, CURLOPT_SSL_VERIFYHOST, 2);
    curl_setopt($curl, CURLOPT_RETURNTRANSFER, true);
    curl_setopt($curl, CURLOPT_HTTPHEADER, array(
        'Authorization: ' . $this->verificationCredentials,
      ));

    $this->responseText = curl_exec($curl);
    $this->resultHttpCode = curl_getinfo($curl, CURLINFO_HTTP_CODE);
    $this->resultHttpInfo = curl_getinfo($curl);
    curl_close($curl);

    return $this->resultHttpCode == 200;
  }
}
The setCredentialsFromRequestHeaders method saves the OAuth credentials sent by the consumer (e.g. Twitter for iPhone, Twitterrific).
These credentials will be used in the verify method which sends the verification request to Twitter.
Using the class above, your custom image service page (e.g. http://api.piclyf.com/twitter) should handle the request like this:
$oauthecho = new TwitterOAuthEcho();
$oauthecho->userAgent = 'My Custom Image Service App 1.0';
$oauthecho->setCredentialsFromRequestHeaders();
if ($oauthecho->verify()) {
  // Verification was a success, we should be able to access the user's Twitter info from the responseText.
  $userInfo = json_decode($oauthecho->responseText, true);
  $twitterId = isset($userInfo['id']) ? $userInfo['id'] : null;
  // You can use $userInfo or $twitterId above to maybe check if you have a record of this user
  // in your db.

  // You can access the uploaded image using $_FILES. Save it and create a url where it can be accessed.

  // Return the image url back to the consumer
  $imagePageUrl = 'http://somwhere.com/image1';
  echo '<mediaurl>' . $imagePageUrl . '</mediaurl>';

} else {
  // verification failed, we should return the error back to the consumer
  $response = json_decode($oauthecho->responseText, true);
  $message = isset($response['error']) ? $response['error'] : null;
  if (!headers_sent())
    header('HTTP/1.0 ' . $oauthecho->resultHttpCode);
  echo $message;
}
The code above is just a sample and your final code will look very different especially if you’re using a framework. I’ve also left out the part where you’ll get the image from $_FILES and save/process it. That is beyond the scope of this article.
Notes
The note in Twitter for iPhone’s custom image service screen says you can get more (developer) info in this url: http://developer.atebits.com. As of this writing, the information on that page is no longer accurate. Twitter for iPhone no longer sends you the user’s username and password. The info at Twitterrific is more accurate. And yes, if your service works for Twitter for iPhone, it should work on Twitterrific too.