This tutorial is heavily based on Rupert’s article here. However, the steps in this article are very different on some points. There are some steps that I had to figure out using other sources.
Generating OpenStreetMap tiles database
We’re going to use downloadosmtiles.pl
to download OSM tiles for a specific region.
-
Download, compile, and install GEO-OSM-Tiles 0.04. In Terminal:
 $ wget http://search.cpan.org/CPAN/authors/id/R/RO/ROTKRAUT/Geo-OSM-Tiles-0.04.tar.gz
 $ tar -xf Geo-OSM-Tiles-0.04.tar.gz
 $ cd Geo-OSM-Tiles-0.04

 $ perl Makefile.PL # make sure there are no errors/warnings
 $ make
 $ make test
 $ make install # you might have to use sudo
If you get errors like this on
Makefile.PL: “Warning: prerequisite YAML 0 not found.”, install the missing Perl libraries first before continuing. -
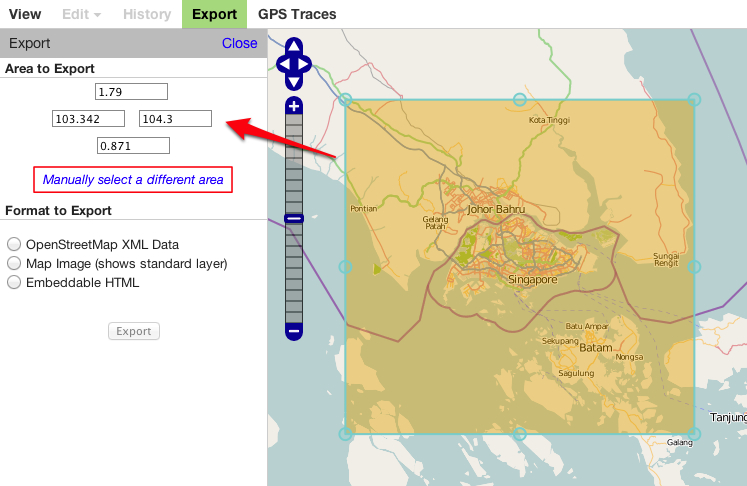
Determine the region you want to download. You can use OSM: go to http://openstreetmap.org and select Export from the top menu. You should be able to see 4 fields specifying the selected region coordinates. Click on Manually select a different area to define your own region.
-
Execute
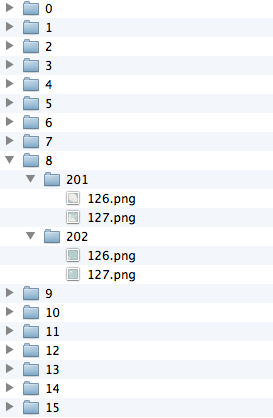
downloadosmtiles.plwith the coordinates and your desired zoom levels to download the tiles:$ downloadosmtiles.pl --lat=0.871:1.79 --long=103.342:104.3 --zoom=0:15 --destdir=/your/tiles/folderWhen specifying values for
latandlong, enter the lowest value first. Calldownloadosmtiles.pl helpto see more options.The destination folder should now contain image files organized like this:
-
Download and run
map2sqliteto convert the tile set to a sqlite database. You can download the source here and compile it in XCode. Or you can download the compiled binary here. We’ll use the compiled binary in this example.$ wget http://shiki.me/blog/assets/posts/2012/03/map2sqlite-bin.zip $ tar -xf map2sqlite-bin.zip $ ./map2sqlite -db /your/mymap.sqlite -mapdir /your/tiles/folder
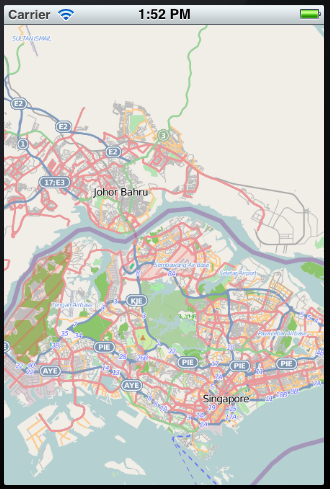
Using the offline map in Route-Me
For a quick example, we’ll use a sample project included in route-me.
- Download and extract the latest route-me library from GitHub: https://github.com/route-me/route-me
- Open the sample project at
samples/SimpleMap/SimpleMap.xcodeproj. Select theSimpleMapscheme and test to make sure it runs before we do anything to it. -
Add the map database you just created to the project’s resources. Make sure that it is also added to the Copy Bundle Resources.
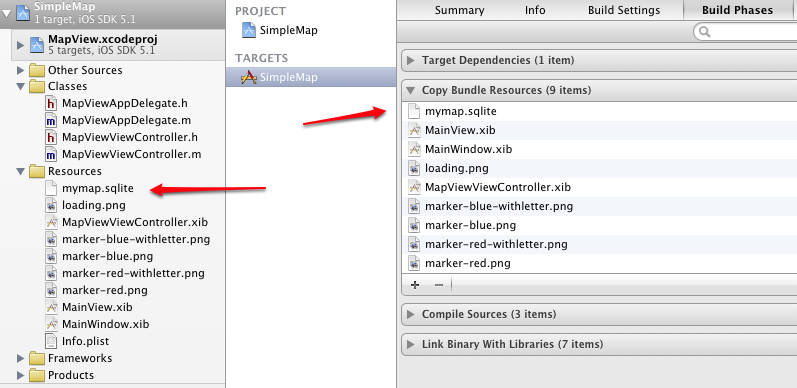
- In
MapViewViewController.m, add an import forRMDBMapSource.h. -
Add this to the bottom of
-viewDidLoadofMapViewViewController.m:// Use the bundled database as our map source RMDBMapSource *mapSrc = [[[RMDBMapSource alloc] initWithPath:@"mymap.sqlite"] autorelease]; [[[RMMapContents alloc] initWithView:mapView tilesource:mapSrc] autorelease]; // Constrain our map so the user can only browse through our exported map tiles [mapView setConstraintsSW:CLLocationCoordinate2DMake(mapSrc.bottomRightOfCoverage.latitude, mapSrc.topLeftOfCoverage.longitude) NE:CLLocationCoordinate2DMake(mapSrc.topLeftOfCoverage.latitude, mapSrc.bottomRightOfCoverage.longitude)]; // Move to the center of our exported map [mapView moveToLatLong:mapSrc.centerOfCoverage];The first 2 lines instruct the map view (
RMMapView) to use the offline map as the map source. The-setConstraintsSW:NEcall is not necessary but I think it’s a good idea to only show the map region that we have exported. The user will see empty gray spaces for regions that we don’t have map tiles for without the constraints.
And we’re done!